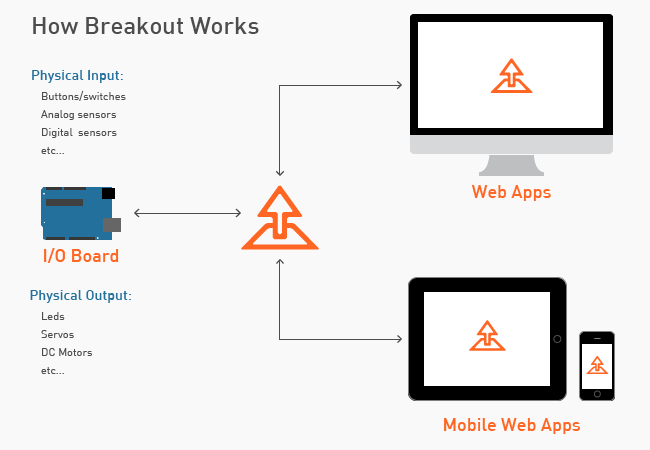
Using Breakout Server
Breakout Server is simple WebSocket and HTTP server that bridges an I/O board (such as Arduino) to a web browser. The server uses webbit for the WebSocket and HTTP server connections. If you prefer, you can serve your pages from another web server (for example if you need to use php) and simply use Breakout Server to connect to the I/O board via WebSockets.
Requirements
View system and browser requirements
Installation
To install Breakout Server, simply download the files to your hard drive. You’ll find a version of Breakout Server for your platform in Breakout/server/. If you cloned or downloaded the repository from github, then this directory will contain folders for Mac OS X, Windows (32 bit and 64 bit) and Linux along with the server source code. If you downloaded the Breakout zip package from the Download link, you will find a zip for each platform in the Breakout/server/ directory. Note that if you move the server files out of the Breakout/server/ directory, you will need to update the webserver root directory location. See WebServer Root Directory in the Settings Panel section of this guide for more info.
Here are more specific instructions for each platform:
Mac OS X
If you downloaded the Breakout release package, expand the breakout_server-mac.zip file in Breakout/server/. You can either run the Breakout Server application directly from the breakout_server-mac folder or move it to your Applications directory. You can delete the win and linux zip files.
If you cloned the source from github then the contents of the Breakout/server/ directory are not compressed. You can use the server for your platform as is, or you can copy it to Applications or another location on your hard drive.
Mac OS X Mountain Lion (and newer) users may need to temporarily disable Gatekeeper to launch Breakout Server for the first time. After the initial launch you can re-enable Gatekeeper.
Windows
If you downloaded the Breakout release package, expand the breakout_server-win.zip (32 or 64 bit version depending on your OS) file found in the Breakout/server/ directory. You can either move the breakout-server-win folder to another location on your hard drive or run it directly from the breakout_server-win folder. You can delete the mac and linux zip files.
If you cloned the source from github then the contents of the Breakout/server/ directory are not compressed. You can use the server for your platform as is, or you can copy it to another location on your hard drive. If you want to move the Breakout Server.exe application, move the breakout_server-win folder. The rxtxServer.dll must be at the same level as the exe file in order for the server to work properly.
Linux
Breakout Server has only been tested in 64-bit Ubuntu 11.10, 12.04 and 14.04 and it may or may not work on other distributions. You will first need to run sudo apt-get install librxtx-java
to ensure that the serial drivers are properly installed. If you know how to manually install them, you may do that as well. Once the serial drivers are installed you can launch the jar from the command line (java -jar BreakoutServer.jar).
If you downloaded the Breakout release package, expand the breakout_server-linux.zip file found in the Breakout/server/ directory. You can move the breakout-server-linux folder to another location on your hard drive or run the JAR directly from the breakout_server-linux folder. You can delete the mac and win zip files. The librxtxSerial.so driver is included in case you choose to manually install this file, however it should have been installed to the proper location automatically if you ran sudo apt-get install librxtx-java
. The Breakout icon is also included in case you want to create a custom launcher for the Breakout Server application.
Application Overview: Status Panel
The status panel provides the following UI elements:
- A drop-down list to select the serial port the I/O Board is connected to (most often the 1st item in the list so you don’t have to select it).
- A text input containing the network port (default = 8887). You can also change this value (see ‘Changing the Network Port’ below)
- A button to connect/disconnect the server (connects/disconnects the serial port and the web server).
Changing the network port
You can change the network port number by entering a new number. Be sure to press the Enter key upon changing the number. The new number will be stored until it is changed again in the future. When you change the port number, be sure to use the new port number when creating a new instance of the I/O board in your script. For example, if you changed the port number to 9000 in the Status panel you need to use the new port number when creating an new instance of an IOBoard object:
var arduino = new IOBoard("localhost", 9000);
Application Overview: Settings Panel
The settings panel provides the following UI elements:
- A non-editable textbox displaying the web server root directory
- A button to open a file chooser to select a new root directory for the web server
- A checkbox to enable multi-client connections (see the section on multi-client connections below)
Webserver Root Directory
The default webserver root directory is “../../” which is the relative path from the server (ie server/breakout_server-mac) to the root of the Breakout directory. If you move Breakout Server to another directory (such as your Applications folder) you can update the Webserver root directory by clicking the Choose New Webserver Root button and selecting the root directory of your web app(s). This may be the Breakout directory, or any directory you choose to work from (as long as you also copy the Breakout.js file and any other required files to that directory). The new webserver root will be stored until you change it again in the future.
Multi-client Connections
By default Breakout Server only supports one client connection at a time. While one browser is connected, if another browser tries to connect, the connection is taken over by the 2nd browser. This is because in default mode, upon connect, a soft reset of the I/O board is performed to set the pins back to their default state. This is helpful when you are writing a script and want new code to execute when you refresh the browser. If the I/O board pins did not reset to their default state, the script would begin executing with the board in the state it was in prior to refreshing the browser.
However, there are other cases in which you may want to share data from the I/O board with multiple clients. In this case you expect to connect to a I/O board in its current state. Enabling the multi-client connections checkbox will allow multiple clients to connect to the server. Upon connection, the current state of the I/O board is copied to the client so there are no interruptions of data being viewed on other clients.
If you only need a single client connection but do not want the I/O board to reset it’s state upon refreshing the browser, then you can also enable multi-client connection mode for that purpose.
Also, it’s worth noting that multi-connect mode works well when you are sending data from the IOBoard (such as sensor data), but not as well when you are sending data to the IOBoard (such as controlling a motor or an RGB led) unless each client is trying to control a unique component on the IOBoard.
Connecting
Clicking the ‘Connect’ button creates the serial connection to the I/O board and also starts the WebSocket and HTTP server. Upon connection you should see the following in the status message area:
- The name and port of the computer you are connected to.
- The Serial port you are connected to.
- The Connect button should now read “Disconnect”
Note that when you click the Connect button that the IOBoard is reset. This is helpful if you are in multi-client mode and want to reset the IOBoard to it’s default state. All clients will be disconnected when the Disconnect button is clicked.
If you enabled multi-client connection mode in the Settings Pane, then you should see the following:
To connect a client, open web browser and enter the url of an html file (be sure to include the port number in the url… for example: http://localhost:8887/examples/getting_started/hello_world.html). You should see the connection status as follows:
In multi-client connection mode you will see the number of active connections. Note that the client number may be higher than the number of active connections, especially if you are refreshing one of the open browser windows.
Connecting Mobile Devices
Mobile browser clients can connect to Breakout Server if they support WebSockets. Currently iOS, Firefox (8 or higher) for Android and Chrome Beta for Android (ice cream sandwich only) support WebSockets. Performance depends on the complexity of the web app you are trying to load. To connect a mobile device, you must be on the same network as the computer running Breakout Server and you must set the IP address in the IOBoard constructor to the IP address of the computer running the server. For example if the IP address of the computer running Breakout Server is 192.168.1.20 then instantiate an IOBoard as follows and you should be able to load the page on a mobile device:
var arduino = new IOBoard("192.168.1.20", 8887);
Troubleshooting
If you run into any issues while trying to use Breakout Server, first check the following:
- Make sure your firewall allows port 8887 (or any new port number you may have set).
- Make sure your I/O board serial port is available. Verify by compiling and uploading a sketch in the Arduino IDE.
- Ensure you have Java Runtime Environment version 1.6 or higher installed.
- If you moved Breakout Server out of the Breakout/server/ directory, make sure you updated the WebServer Root Directory location in the Settings panel.
- If you are attempting to connect from a mobile device, make sure the device browser supports WebSockets and that you are on the same network as the computer running Breakout Server. Also make sure you are using a fairly new device (for example iPhone 3G and older are too slow).
- Check the Troubleshooting Forum.
- If you’re running Linux, post to the forum and I’ll see what I can do (I’m no Linux expert).
- If the issue persists, file an issue on the Breakout github site.